Set up VS Code for Lean
Lean is written in constant conversation with the compiler, and the pane that shows that conversation is called the infoview. Without it we are working blind, so an editor extension is the one piece of setup that is not optional. This page covers VS Code; Set up Neovim for Lean covers the other common choice.
Installation
Install the official Lean 4
extension,
published by leanprover, from within VS Code or from the Marketplace. It
guides the rest of the setup, and installs elan if it is not already present.
Then open the project directory, the one containing lakefile.toml, as a
folder. The extension starts the language server with lake serve inside it.
What the infoview shows
The infoview opens automatically beside a Lean file, so no key press is needed
to summon it. If the pane is closed, searching for Infoview in the command
palette brings it back.
It shows the goal and the messages at the text cursor, and redraws as the cursor moves, exactly as described in the tutorial. In addition, it carries an All Messages section, which lists every message in the file at once. That is worth knowing when comparing a screen with the output quoted in these notes, which is always the output at one position.
With the file from chapter 1 of the tutorial open and the cursor on line 6, the window looks like this:
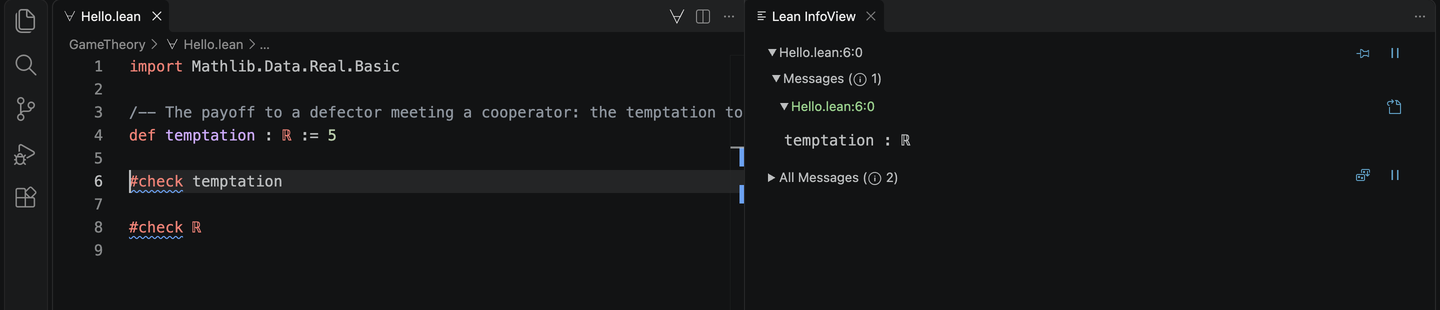
Resting the mouse pointer on a name shows its type and documentation comment, and the usual VS Code commands for going to a definition work on any name, including those in Mathlib.
Key bindings
The extension adds a handful of key bindings. On macOS they use Cmd where other systems use Ctrl:
| macOS | Linux and Windows | Does |
|---|---|---|
⌘⇧↵ |
Ctrl+Shift+Enter |
Toggle the infoview |
⌘⇧⌥↵ |
Ctrl+Shift+Alt+Enter |
Toggle the All Messages section |
⌘⇧X |
Ctrl+Shift+X |
Restart the Lean server for this file |
⌘⌥\ |
Ctrl+Alt+\ |
Insert a unicode symbol from a list |
Restarting the file is the one to reach for when the infoview stops responding
or reports something that is clearly stale. It is cheap and fixes almost every
case of a confused server. Every other action, including pinning a goal, is in
the command palette under Lean 4.
Unicode input
A backslash starts an abbreviation, and the expansion happens as we type. The ones that come up constantly in these notes are:
| Type | Get | Type | Get |
|---|---|---|---|
\R |
ℝ | \to |
→ |
\N |
ℕ | \le |
≤ |
\sum |
∑ | \ne |
≠ |
\in |
∈ | \and |
∧ |
\all |
∀ | \or |
∨ |
\a |
α | \ma |
↦ |
Most have several spellings, so \forall works as well as \all.
A final check
Open any .lean file in the project and wait a moment for the server to start.
The infoview should appear beside it, showing the file's own output. If nothing
happens, the two usual causes are that ~/.elan/bin is not on the PATH, or
that VS Code has opened a loose file rather than the project folder.